ThisLifeSucc
1225
13
2

As IBM Model M's age, more and more of them lose their rivets. Some get drinks spilled on them; in some cases the membranes give out on their own. In all of the cases above, a Bolt/Screw Mod is the best course of action to make your IBM great again. This is why I decided to write this little tutorial. I want to help people get their IBMs working and typing again.
There are 2 ways to do a Bolt Mod:
- One is with regular bolts. This is the one I will do.
- The other is with countersunk bolts, which requires you to do the regular one as shown below and also drill out little recesses in the barrel plate to house the countersunk bolt heads. It requires a bit more work but is more visually appealing.
Bolt Mods should be done with m2 bolts.
There is also the Screw Mod, which is easier and less time-consuming to do, while offering comparable durability and strength. It's usually done with 2 . 2x6 . 5mm or m2x8 self-tapping screws, and the pilot holes for them are to be drilled with a 1 . 7-1 . 9mm or 1 . 5-1 . 7mm drill bit. It's worth mentioning that even after a Screw Mod has been done, a Bolt Mod can still be done. Doing a Screw Mod after a Bolt Mod has been done but is less advised.
If you are not planning on dissasembling your board too often in the future, I would highly recommend it.
Here is my little supplement tutorial on the Screw Mod(and crack repair):
www.imgur.com/gallery/screw-mod-crack-repair-supplement-tutorial-ibm-model-m-1988-1IpQlWF
So here is the patient. A very nice IBM Model M SSK from 1991. It works but has lost a ton of rivets.
It belongs to a friend of mine for whom I will be doing the Bolt Mod.
Pretty much everything shown here still applies to other Model M's since they are very standardized. Using this tutorial, you can Mod any Model M.
*This process can also be used to do a partial or lazy repair. You can drill out only a couple of rivets or only the ones that are broken without removing anything and do a Bolt/Screw Mod on those.

So let's begin!
First things first. Test your keyboard. If it works, then you can be pretty confident that the membranes are fine and don't require much attention. If it's completely dead or does weird things, you will have to do your testing after the Mod, and if the membranes or controller are dead, you might have a problem.
I like to set up a little work area with a towel and a plastic board to prevent scratching up the case.

To open any IBM Model M, you will need a long 5.5mm(7/32") socket as seen here. There are also standalone 5.5mm socket screwdrivers. The bottom of the keyboard is held on with plastic clips. You open it by lifting the top part, and the clips will just come out.

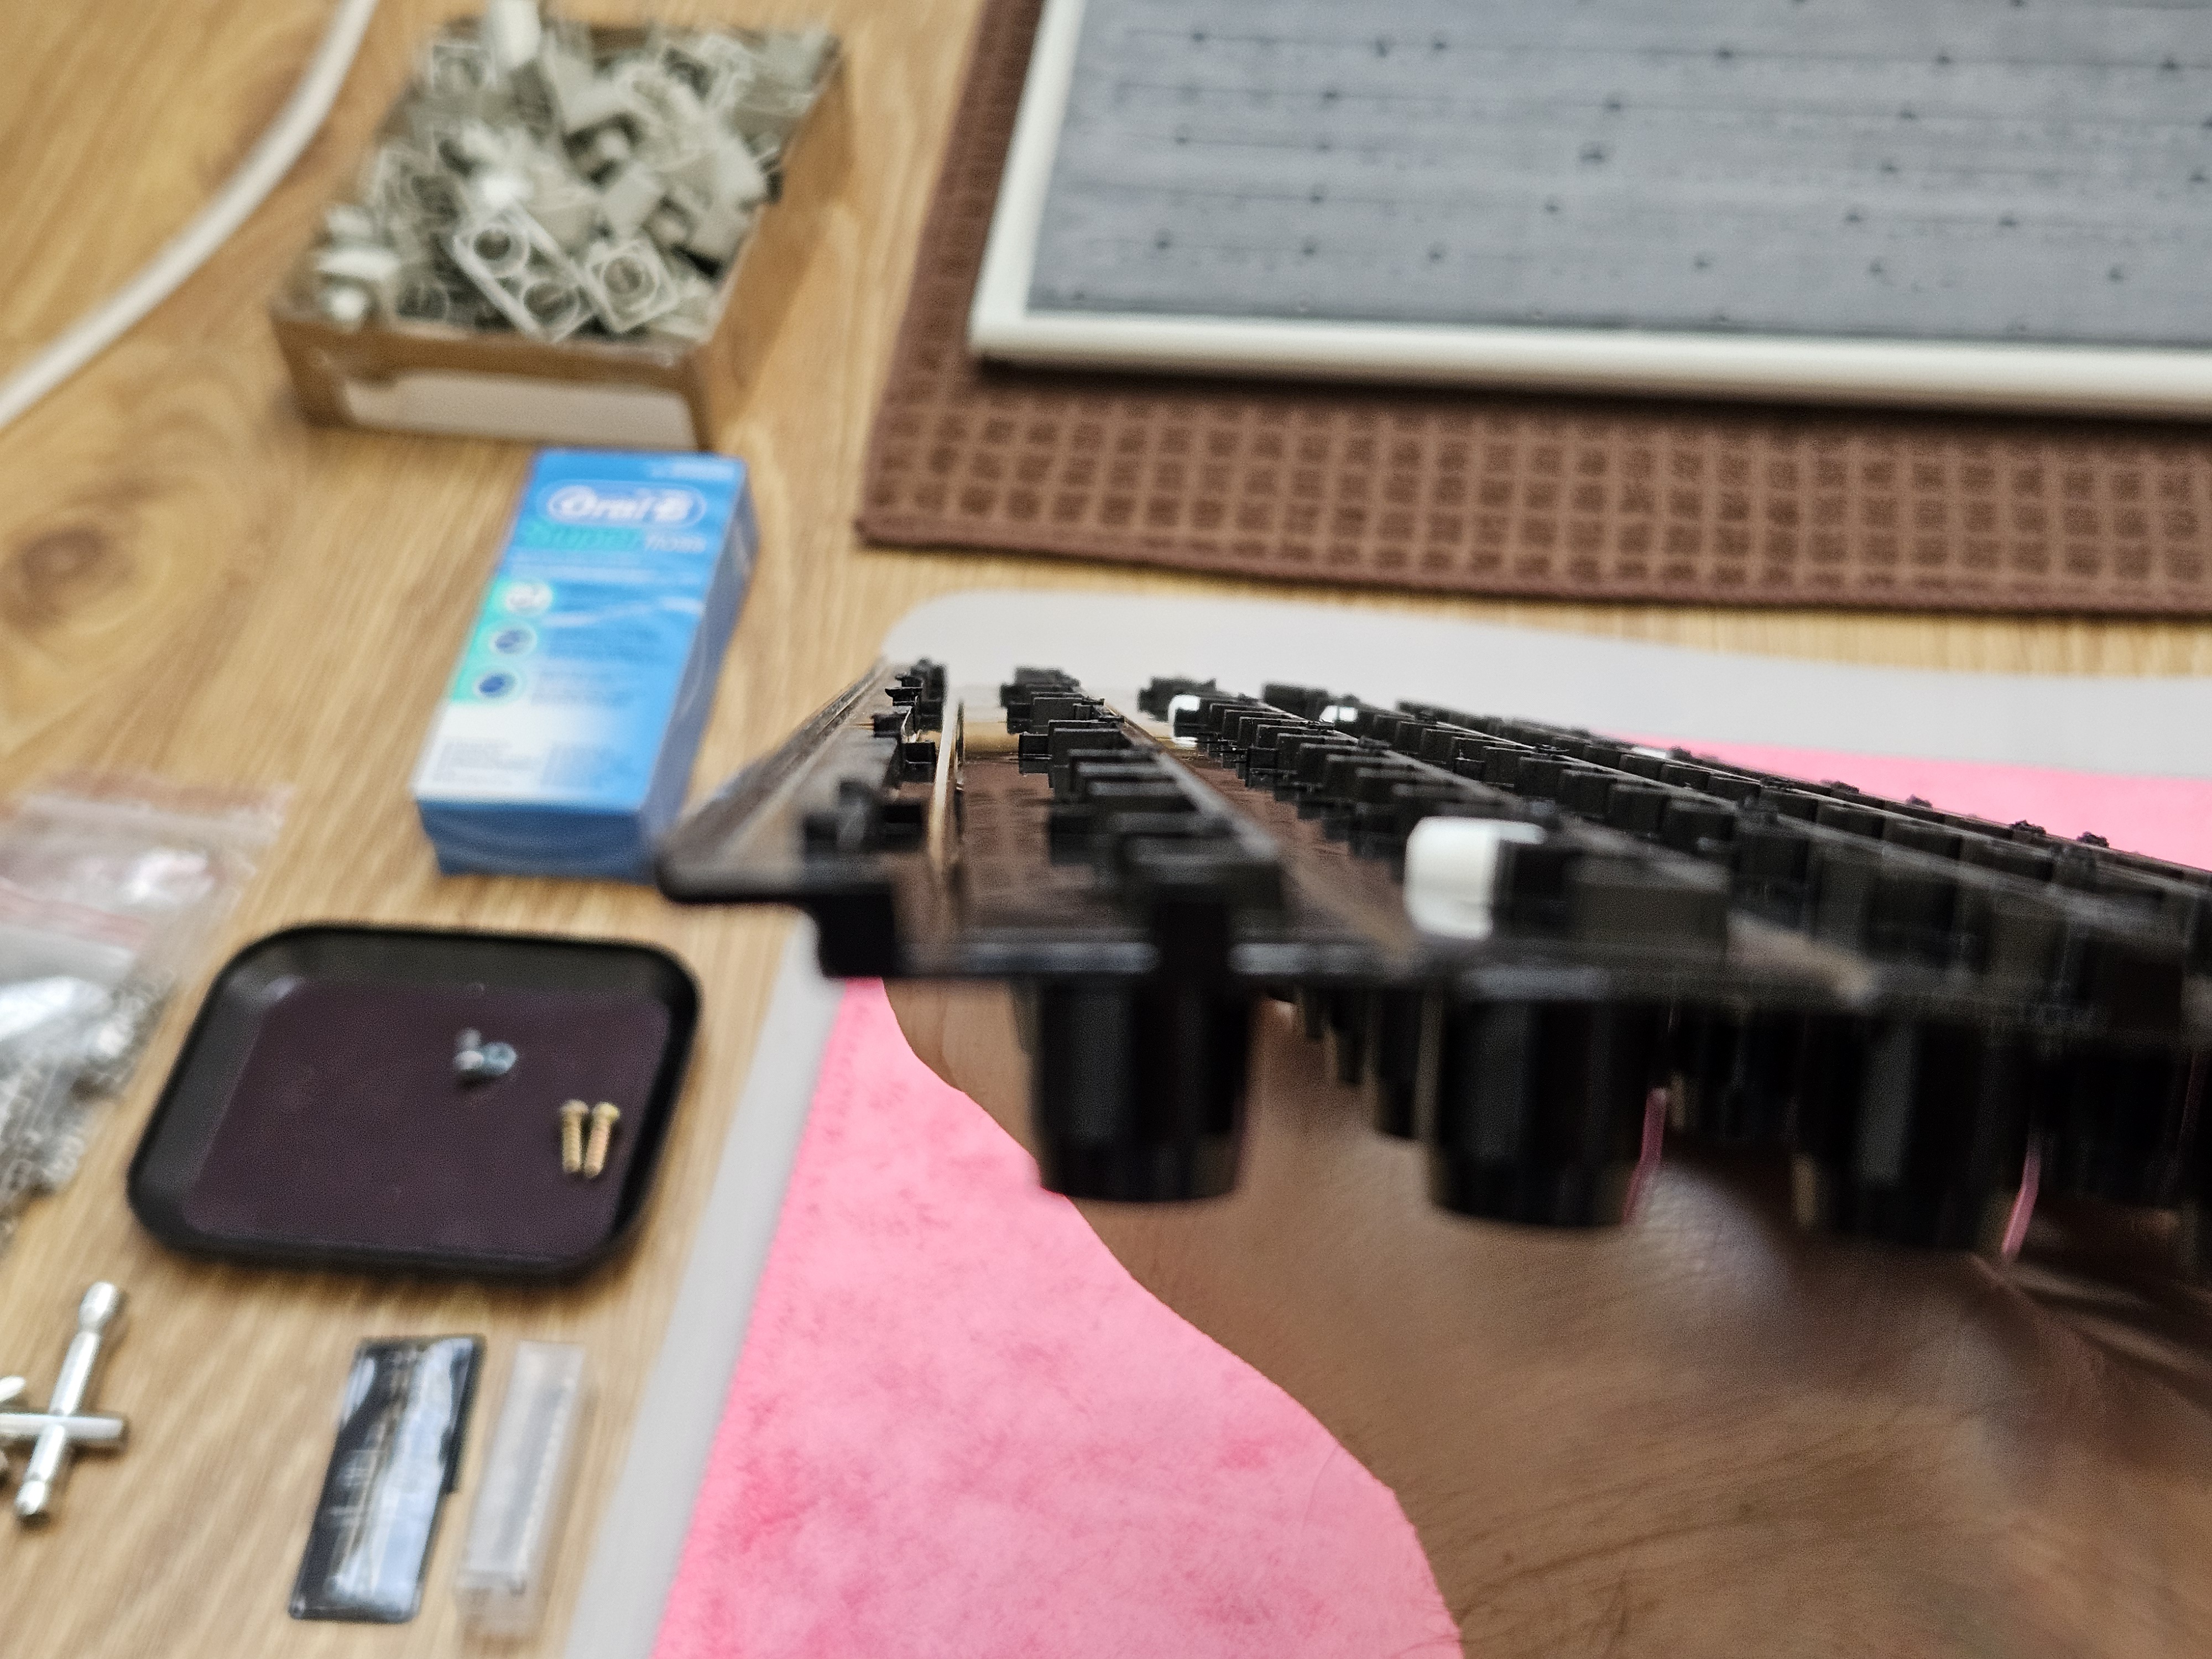
Here is my kit for Bolt Modding and Floss Modding.
I will be going into more depth about the tools used as we go but here is a list of all the stuff needed for all the Mods:
Must have for any Bolt/Screw Mod:
- Heavy-duty nail clippers
- Flat and m2 Philips head screwdrivers
- A good pair of tweezers
- A couple of plastic clamps or large binder clips
- A Dremel or a drill
- Exacto knife or something to remove the rivets with
- Maybe a pair of needle-nose pliers
For a regular Bolt Mod:
- m2x8 regular bolts: DIN7985(all regular m2x8 bolts should work)
- m2 low-profile nuts: DIN 439
- m2 small thin washers: DIN 125
- 2.1-2.3mm drill bit(more testing needed for precise info)
- m2 socket, I like to use these m2/m2.5/m3/m4 multitools
For a countersunk Bolt Mod:
- 6.3mm 90° countersunk bit: DIN 335
- m2x8 tapered bolts: DIN 965(all tapered m2x8 bolt should work)
- m2 low-profile nuts: DIN 439
- m2 small thin washers: DIN 125
- 2.1-2.3mm drill bit(more testing needed for precise info)
- m2 socket, I like to use these m2/m2.5/m3/m4 multitools
For a Screw Mod:
- 2.2x6.5 tapered self-tapping screws: DIN 7982(all tapered 2.2x6.5 self-tapping screws should work)
- m3 small thin washers: DIN125(it is possible but not advisable to do the Screw Mod without the washers)
- 1.5-1.7mm drill bit(more testing needed for precise info)
Since we will be doing a standard Bolt Mod we need the must haves and the regular Bolt Mod hardware.

After opening up the keyboard, carefully remove the inner assembly and the controller board. The most delicate parts are the ribbon cables, which will have to be slid out of the controller board. Make sure to not bend them at extreme angles. After that's done, you have to unscrew the grounding cable from the backplate.
*Depending on the age and type of your Model M, the controller might be in a different place and might be mounted in different ways. If that is the case, you can figure out how to remove it on your own or ask for help.

So here we are. The case and controller can be set aside, as we will be focusing only on the inner assembly. Do a visual inspection of the assembly. Make sure that there isn't any excessive rust or water damage, since it could be detrimental to the membranes inside.

Use your fingernails to try to wiggle any already loose rivets. As you can see here, a bunch more fell off. This keyboard really did just barely hold together.

This would be a good time to remove the keycaps. It will be harder to do that after we open the assembly.

Use 2 objects of similar height to prop up the assembly in an upside-down position.

Make sure that the springs are above the ground since they could catch and get damaged.

The best tool I found for removing the good rivets is an Exacto knife with a blade like this one.

Precisely cut off the remaining rivets. Make sure to cut away from the ribbon cables so as to prevent the knife from cutting into them.

I'm too lazy to try to remove the whole sticker, so I just cut around the rivets, which have to be removed.

There we go! All the rivets are gone.
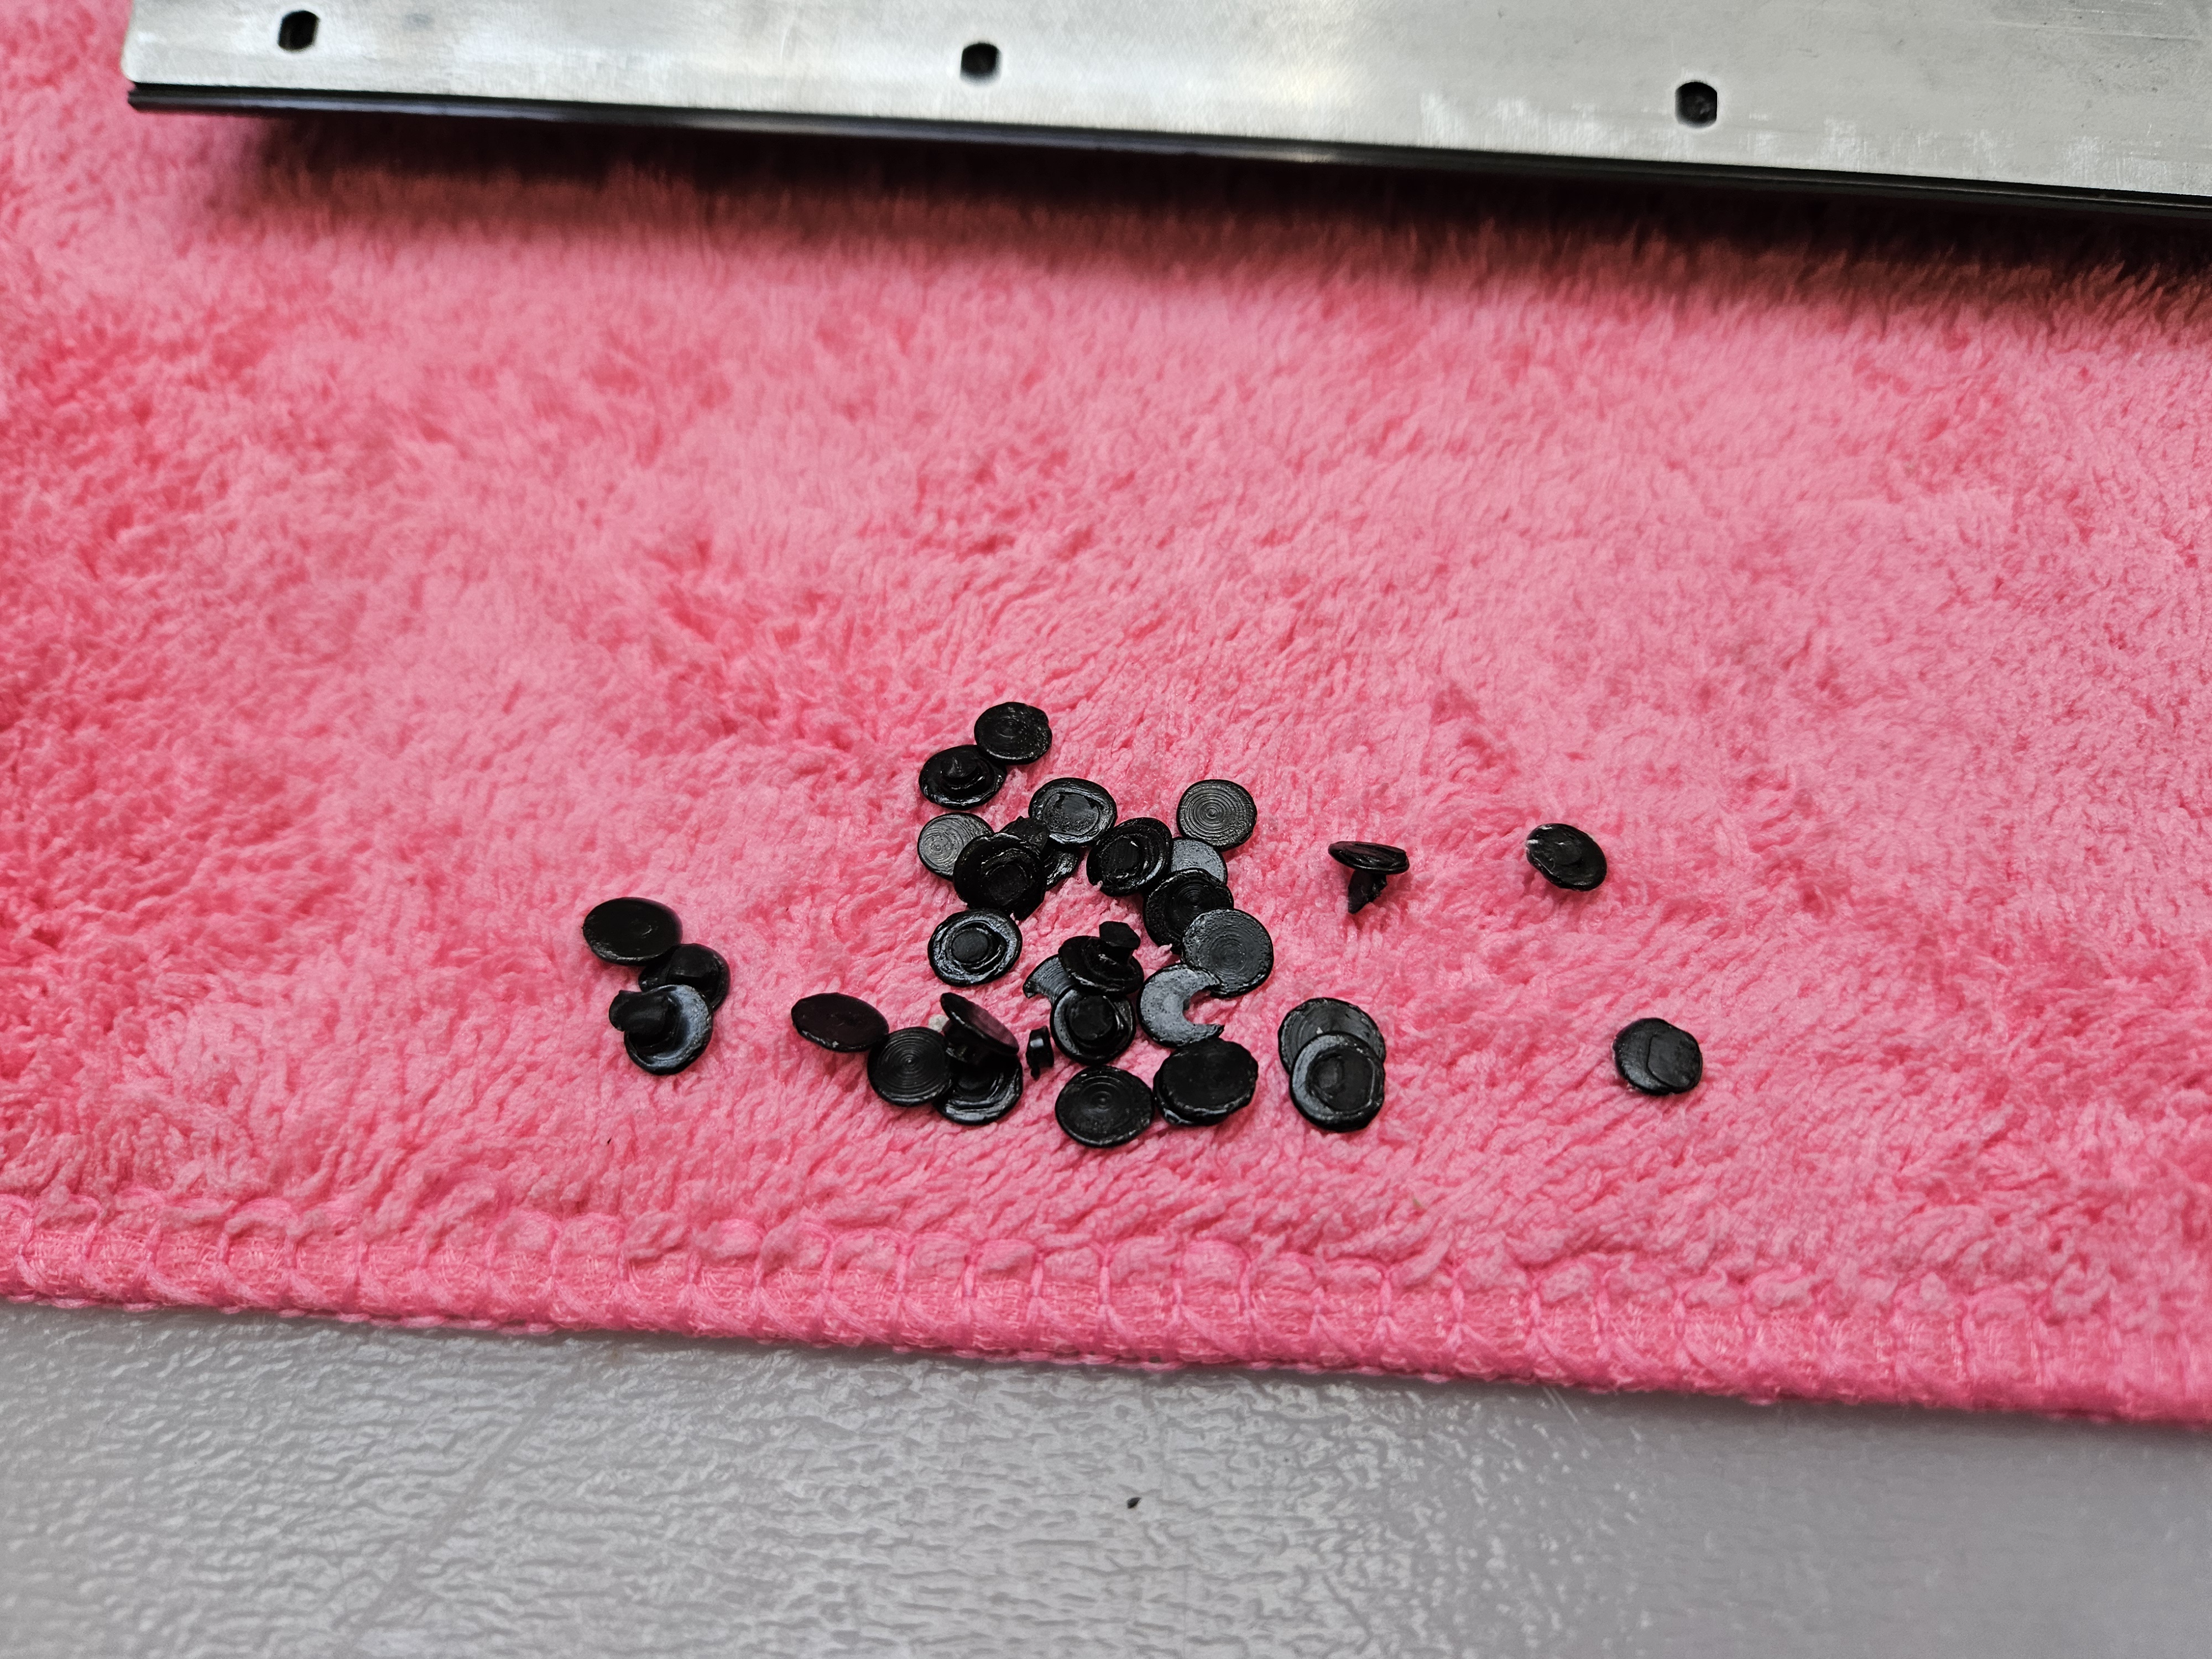
A nice little scoop of snacks.

With the assembly still propped up above the ground, use a screwdriver to GENTLY push the rivets inwards. Do it in a couple different spots around the keyboard until the metal backplate separates from the rest.

There we go!
The assembly is open. We still have to remove the membranes and the rubber mat.

There are 2 spots that usually will keep your membranes from coming off clean. Snip those with the nail clippers. Don't damage the membrane.

Everything comes off easily afterwards. Make note of the order in which the membranes and rubber mat are stacked.
Anyway, here are the flippers!

Dump them out of the barrel plate, making sure not to lose any.

This is an older IBM Model M, so it still has the two rubber hoses on the sides used to seal the assembly. Remove those along with the flippers.
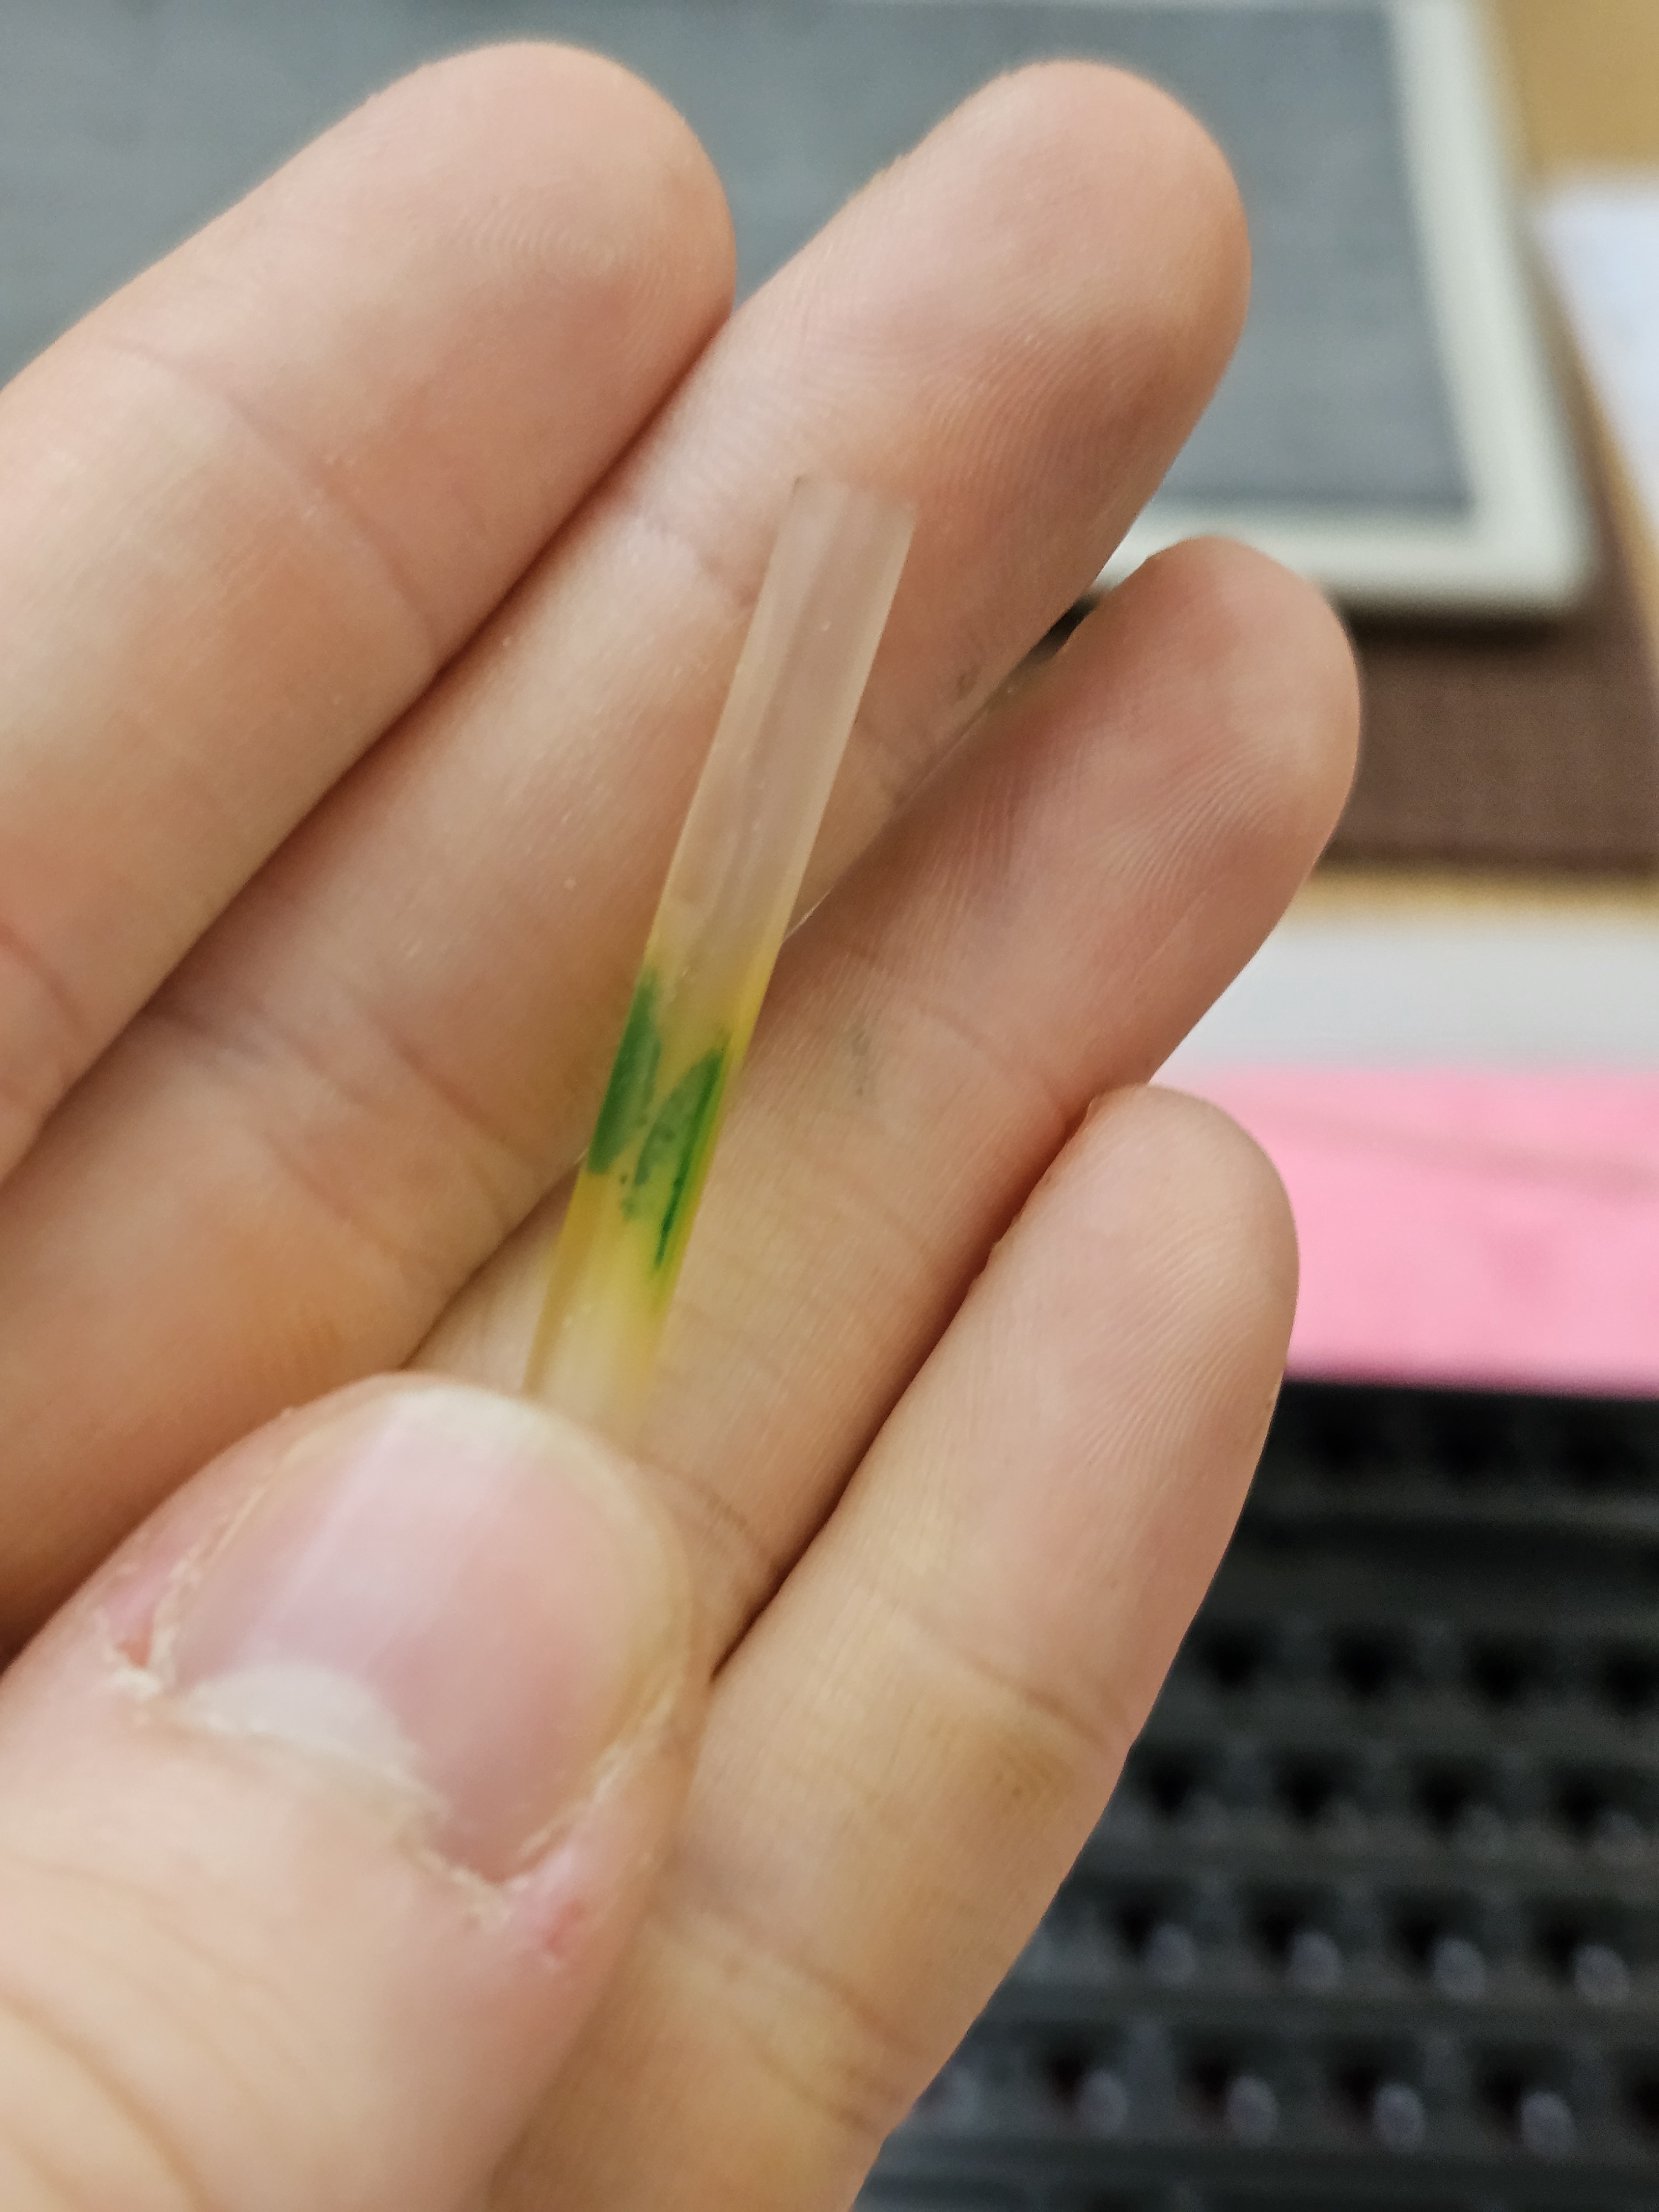
Weird. Someone spilled some green ink on one of them.
Anyway

Inspect the barrel plate for cracks. As you can see, some cracks are slowly forming here, but nothing alarming for a 1991 Model M.
You don't have to remove the stabilizer inserts. Better just leave them in, as they will make it easier to not mix up the flipper positions upon reassembly.
You can hold it up to sunlight and bend it slightly to see if there are any open cracks. Preferably, those would have to be welded or glued together.

No major cracks, so we can go on. Use the nail clippers to clip off the remaining parts of the rivets.

This one has broken off along with the rivet. Ideally this is how it should look after removing the rest of the rivet.

This is the remaining part, which will have to be cut off. Don't clip off the little standoffs around them.

There we go!
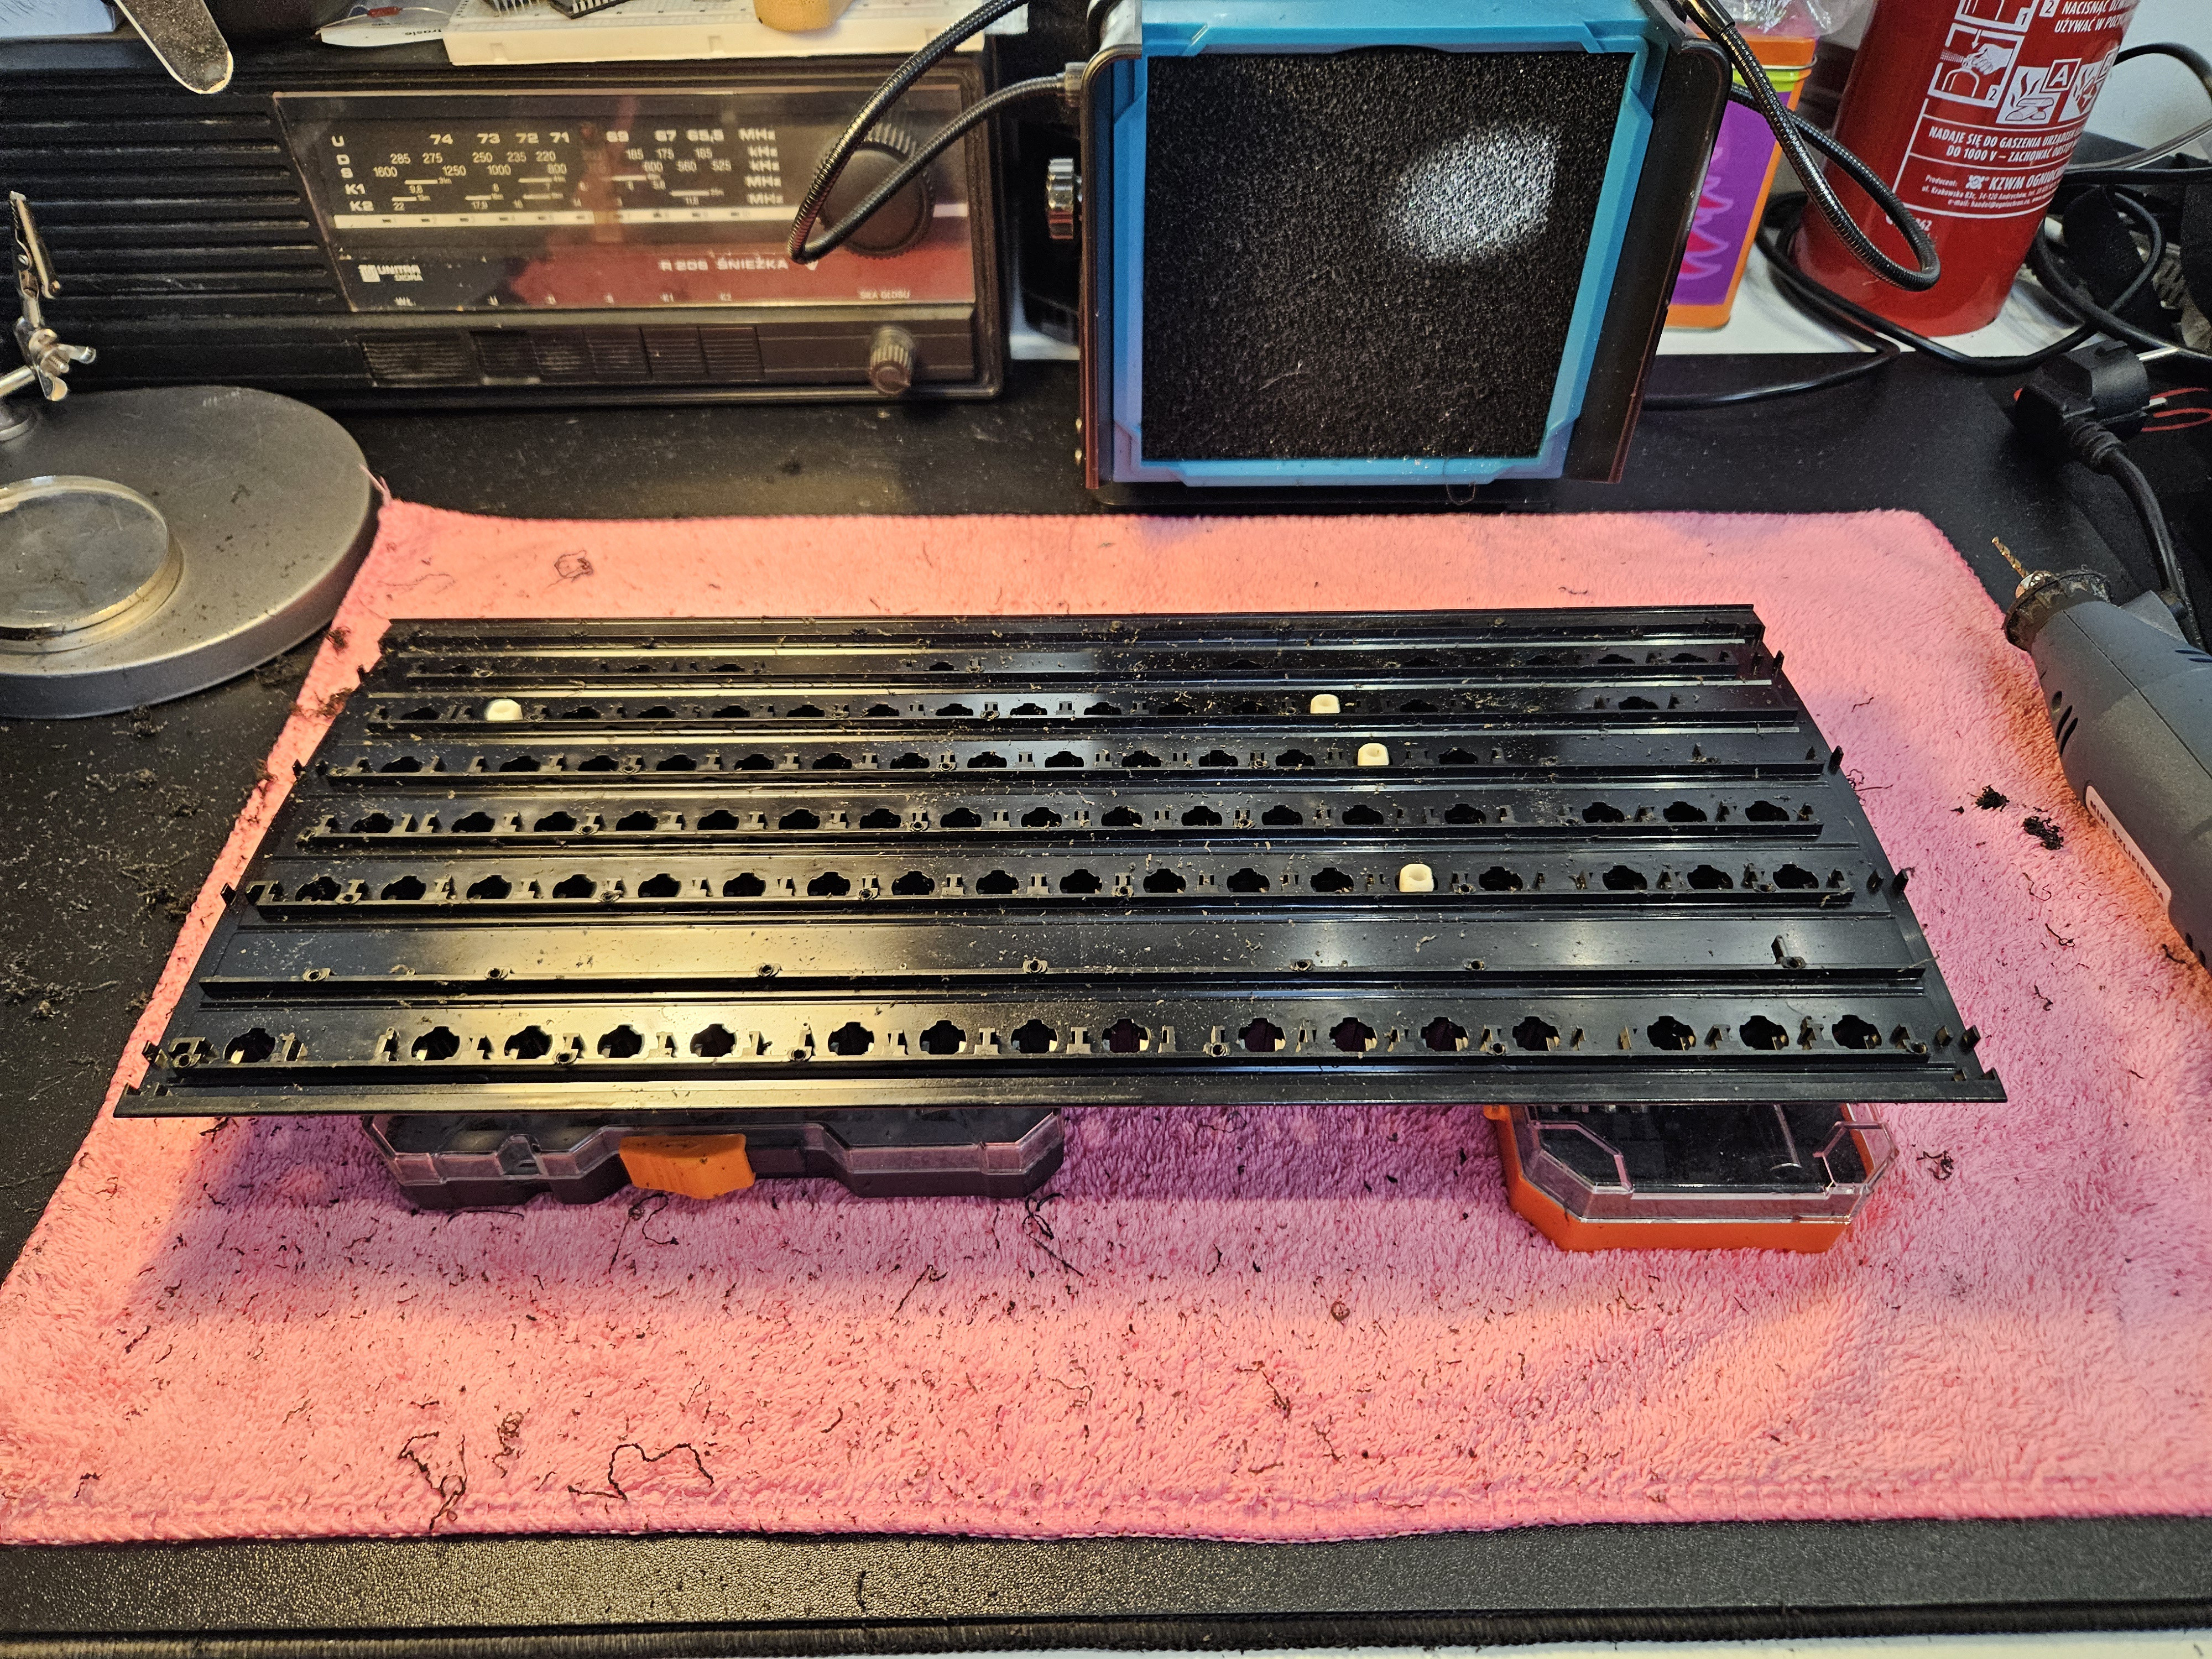
All of them removed. Make sure not to remove the bottom row of them. Those will be used for positioning everything afterwards. They are not necessary but will make everything a bit easier.
Here they are. Don't remove them, and don't drill them out.

Now for drilling.
Use a 2.1, 2.2 or even 2.3mm drill bit.
(more testing needed for precise info)
IMPORTANT!
Don't screw the bolts into the plastic. The bolts should go into the holes without having to screw them in at all. This makes sure that the barrel plate, which is made of old weakened plastic, doesn't stress too much and doesn't crack around the holes. Screwing bolts into the plastic is a big no-no.
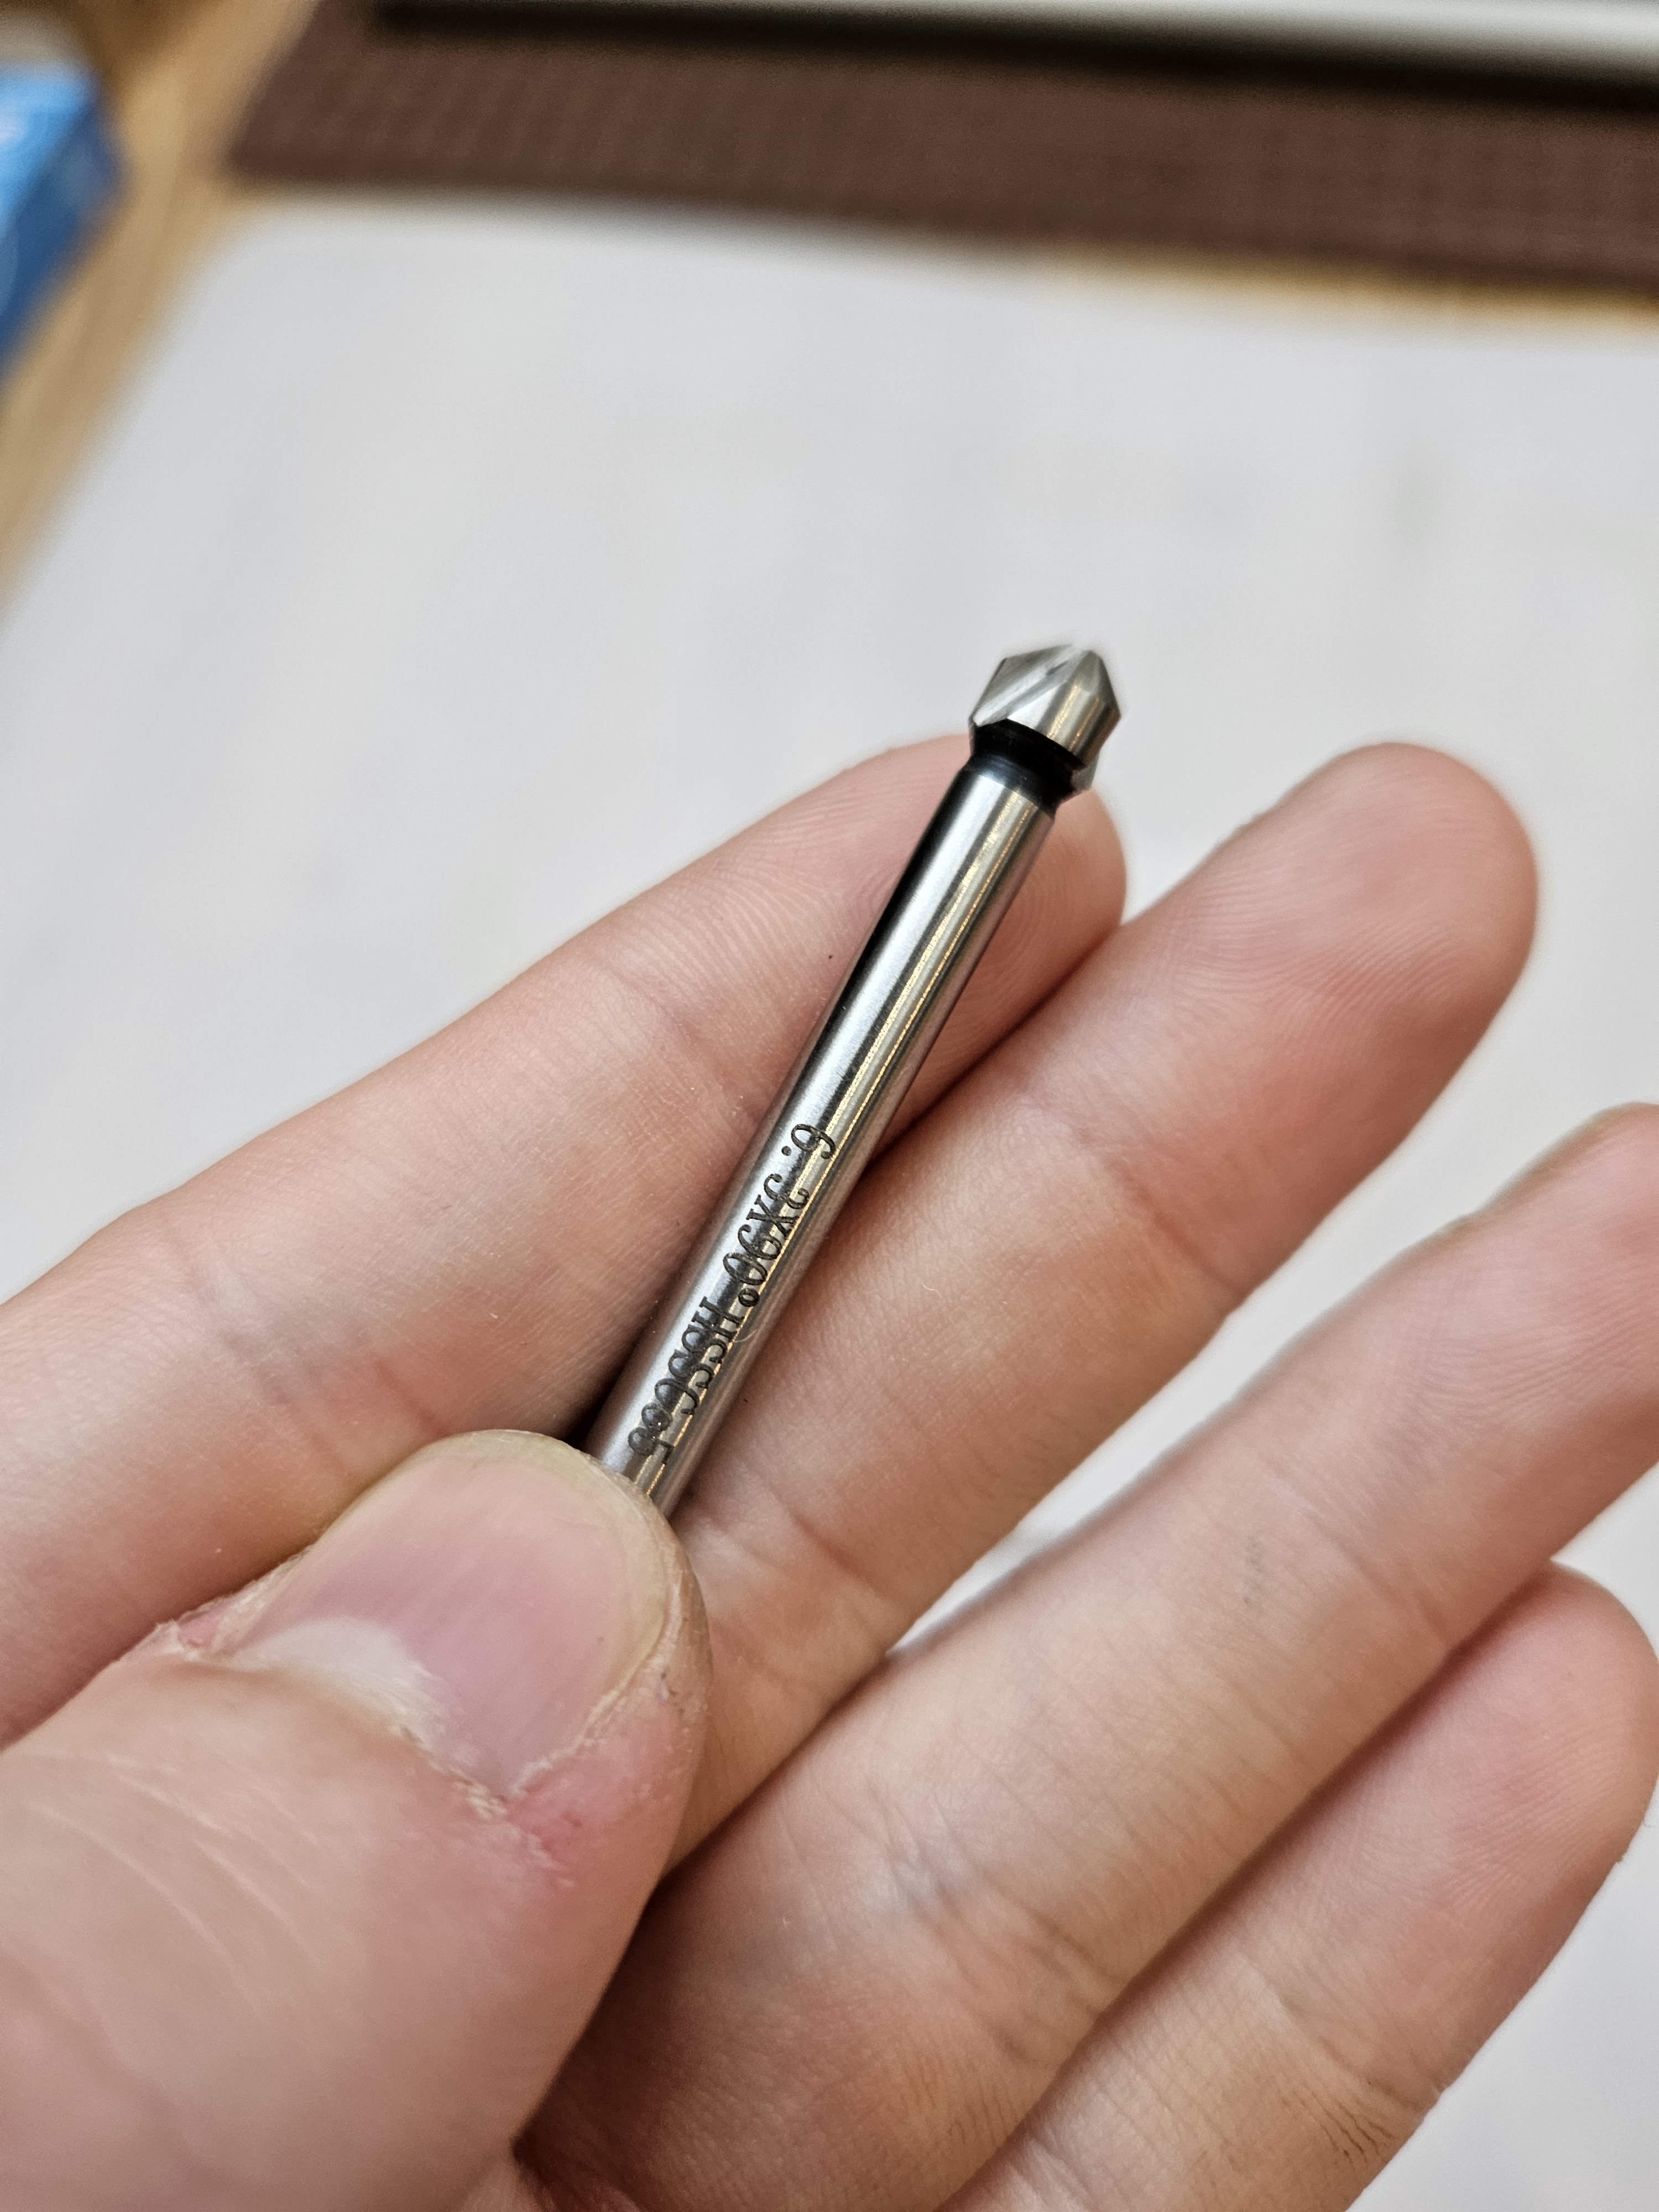
Here is the countersunk bit close up. I will not be using it since it does remove a bit of plastic from the holes. Since this IBMs barrel plate is already very weakened, I find it preferable to use the regular bolts instead of drilling away even more precious plastic and playing around with the fragile barrel plate.
For newer or less brittle barrel plates, countersunk bolts are a great option since you can make the heads of the bolts flush with the top and looking a bit nicer.
*Statements from people who have done countersunk Bolt Mods on already cracked barrel plates suggest that it doesn't have much of an impact on the longevity or durability of the plates. So if you feel comfortable with doing it and want that look, by all means try it!

Set up your drilling station. The slowest setting on my Dremel works great. Don't use a very fast setting since you could start to melt the plastic while drilling it.
Prop up the barrel plate on something and start drilling holes in the spots where rivets have been.
*Some people like to make little indentations with a pointy tool or a pointy soldering iron tip in the places where rivets have been to guide the drill. I don't do it, but if you feel insecure or have shaky hands, you might want to consider that.
If you are going to be using the soldering iron, mind the fumes! Wear a mask or work outside, or even both.

This is how it's supposed to look. Be very careful while drilling the holes. Go slowly and precisely. It's pretty easy to slip and damage the barrel plate.

Drilling will create a mess of plastic shavings.

So wear a mask and protect those lil lungs of yours.
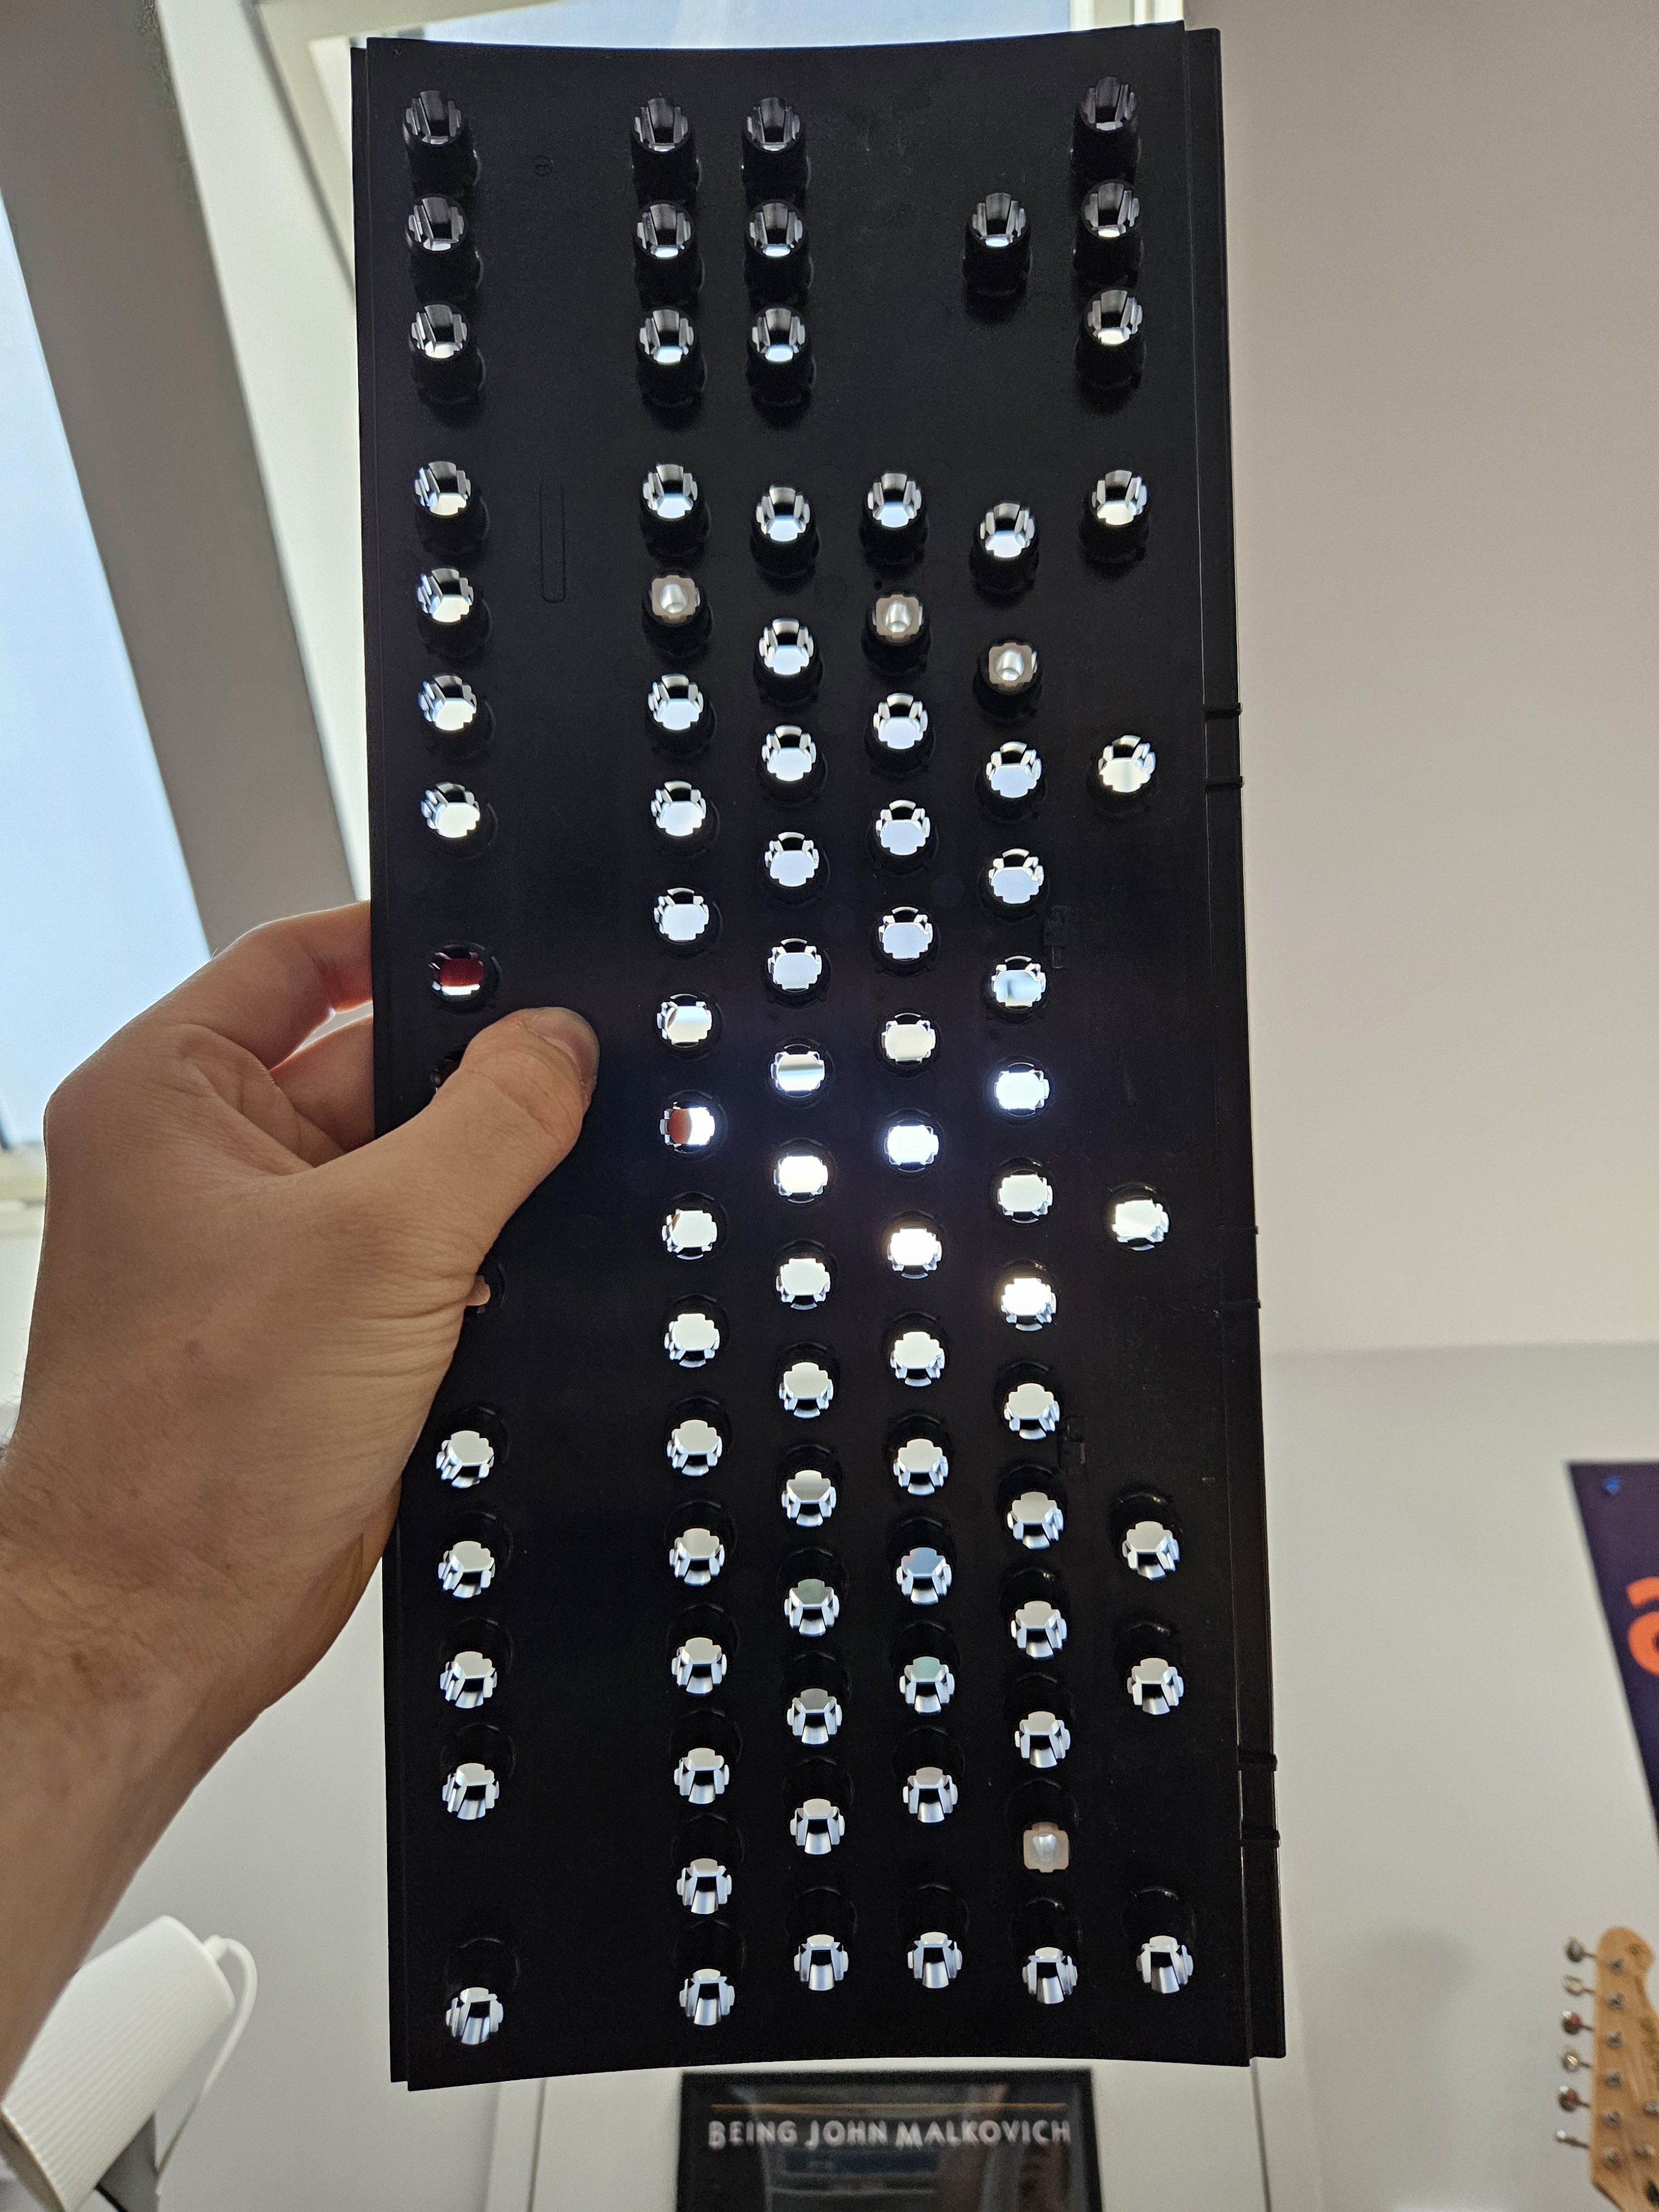
All done!

What a mess...

Make sure that each and every single rivet was drilled through(except for the bottom row). Use compressed air to clean the barrel plate from the plastic shavings, or better yet, use the opportunity to deep clean the barrel plate with water and a brush.
If you are doing the mod with countersunk bolts. This is the time to make the countersunk recesses.

Oh no!
One of the rivets has broken off and chipped the barrel plate. Good thing it's only a small piece.

Time for reassembly.
Prop up the assembly like before and reinstall all of those pesky little flippers. A pair of good tweezers will help a lot.
One barrel(the one next to the spacebar and Alt key) will be empty.
You haven't lost a flipper. It's supposed to be like that.
If any others are empty, you have lost a flipper....

Put the rubber mat and membranes back on. Make sure that the order in which everything is stacked is the same as it was before.
This is why we didn't remove the bottom row of rivet remains. They help position it and keep it in place.

I like to use clamps or large binder clips to hold everything together, but you can manage without them. It will be significantly trickier, though.

Now for the most infuriating part. A bunch of m2x8 bolts, m2 low profile nuts, and small thin washers to replace the rivets.
IMPORTANT!
Don't use too much force when tightening them! Slightly tight but unaggressive should be the goal. Better to have to re-tighten them later than to have your keys lean or even get stuck on each other.
Also, if your Model M is particularly old, the backplate might be too thick. If that is the case, try doing it without the washers. If that doesn't help, you will have to use longer bolts and might have to cut the ones near the bottom of the keyboard to make them flush with the nuts later(you might be better off doing the Screw Mod in this case). Such old Model M's with wire stabs on the numpad will also have 2 bolt heads colliding with the wires and 1 with the wire stab holder. You can omit those, use countersunk bolts or do a Screw Mod on them.

First 2 done in the middle to help hold everything together.

As you can see, they are perfectly flush and not much taller than the original rivets.

An SSK specific thing.
A little plastic bit has to be shaved off to make the bolt sit flush with the barrel plate.

This hole is not a hole! It's located under the enter key.
Don't try to screw anything into it or you will damage the assembly.

After installing a couple of bolts in the vital places and securing the assembly, it's time to test it.

Install a couple of keys in random places and connect everything up to the controller.

Hook it up and see if the keys you have mounted work.
If they don't, you messed something up and have to open the assembly. Check the state of the membranes, the order in which you stacked them, and see if everything is hooked up correctly.
If they work, it's time to finish up the Bolt Mod and install the rest of the bolts.

All the bolts are installed. The bottom row has not been drilled through and has no bolts. It should be like that. A couple of holes might not have bolts in them. As long as all the holes visible from the top have bolts in them, it's fine.

Time to install all the keycaps.

And check if everything works and feels nice.
And it does! Hell yeah!

Closer visual inspection reveals that even though I was extremely careful not to use too much force, the H and J do lean in ever so slightly. In extreme cases they can catch onto each other.
Slightly loosen the nut below them. In time they usually straighten out if they haven't been overtightened too much.

The normal gap should look like it does on keys without bolts near them.

Anyway, here it is in all of its glory. What a nice keyboard!
I hope this tutorial helps you do your own Bolt/Screw Mod.
If you have any questions, concerns, or suggestions, feel free to comment below.
Good luck on your keyboard journey!
UnitConversionBot
5.5mm ≈ 217 thousandths of an inch
ThisLifeSucc
Or 7/32" if you don't want to loose your mind
IckesTheSane
This is awesome, thank you! The Model M I use at work just started having an issue with one of the letters. Hadn’t gotten around to cracking it open to see what’s wrong with it, and it never occurred to me to put in a little more effort while I’m in there to make it more usable or repairable in the future!
ThisLifeSucc
I'm glad I could help :D
OrkenMork
I have a Keytronic KB101 in a box in my basement somewhere...gotta find some way to convert it to USB so I can use it again!
ThisLifeSucc
It's pretty simple. You need a DIN5-PS2 adapter and a PS2 to USB active converter like this one.
OrkenMork
Yeah...I've got one of those newer type of PS2 to USB keyboard adaptors. The Keytronic KB101 I have doesn't have that connector. It has the original AT 5-pin DIN. So that means I'd have to double up on adaptors to get my Keytronic to work. I'd rather have a more streamlined method...
ThisLifeSucc
You can solder up the female din plug directly into the ps2/usb converter since they are the same port just with a different pinout.
DanielAsparagus
You big nerd. I love it. I discovered Keychron mechanical Alice lay out and I LOVE IT
ThisLifeSucc
Thank you :D
DanielAsparagus
It’s letting me get back into office work with stiff and beat up wrists. I really want that switch tester with 90+ switches. What’s your go to? Cherry speed silver are top notch imo. Hrrrnnngggg https://media3.giphy.com/media/v1.Y2lkPTY1YjkxZmJlMjdscDBrN21rZXp6dHFhbzdyM3VibHJscm83MnRoaWNmMmRrdHRuZyZlcD12MV9naWZzX3NlYXJjaCZjdD1n/83HShcQ47skQ8/giphy.mp4
ThisLifeSucc
I daily drive an F77 Repro and I find Model F buckling springs to be my go to for daily typing. I also like to use Topre for work and studies and of course I sometimes grab a Model M for the fun of it. Beamsprings are also top notch but my 5251 is a bit too big for comfortable daily use. I'm more of an IBM fanboy, but when it comes to non IBM switches I like Cherry vintage MX Black and Kailh White.
DanielAsparagus
Wow you’re deep into the rabbit hole! I’m def a noob compared to you!