meistergervant
1648
21
3

Obligatory finished product first. It is a wooden tabletop, with blind holes drilled in it to house beer bottle caps I collected this year. The glass covers the caps to make an even surface. You can say it is a display case for a collection of bottle caps doubling as a table.
DISCLAIMER: I had to work on weekends at my sister's balcony, with tools i scrapped up in a hurry, and i only had 4 weekends to finish the woodwork before she left the apartments to a new tenant, so not enough time to make it perfect. I like it though.
And no, it was not inspired by Fallout))

I bought a 120x60x3 cm board and had it cut in the store into 100x60 for the tabletop and two pieces of 10x60 to practice drilling. I used MS Excel to calculate appropriate intervals, margins and caps count. Then i drew it out on paper an decided to go with 1 cm interval between caps up and across - and over 300 caps in total.

Practicing drilling holes. Ultimately i used a Forstner drill bit made by Milwaukee, 30mm - to fit the cap size, but at first i could only find a 35mm and practiced a bit with it.

I did not like the 35mm fit. Also, the 35mm bit got so hot by the third hole that it burned the edges. Look closer at the bottom right one.
I realized i will need to cool the drill bit with water or something.

I had to spend most of the day to go to another city for a 30mm drill bit, but it was definitely worth it. As you can see, the fit is perfect, and it is easier to use.

I used a 1mm cell paper to mark the drilling points. Unfortunately after marking half the tabletop i realized I screwed up, as the lines went sideways, and had to flip the thing and start over again. Cue flipping the table meme...

Zoom in to see the markings.

4 cm up and across between the marks. First i aligned everything in 1mm paper, and used the market sheets as templates for easy marking.
I spent 2 weekends on logistics, calculation, practicing and marking. That was the easy part.

The third weekend was when the fun started. I marked the drilling depth by sticking some thick double sided tape on the drill bit. I used a cheap Chinese handheld electric drill at medium low speed.

The 30mm Forstner drill bit.

I realized that drilling every hole might be impractical:
1. I had too little time.
2. Mark and calculation errors might be too visible.
3. 300 caps is too much to process visually, they kinda lose individuality.
4. I was afraid the glass might break if i put some weight in the wrong place
5. I could always drill more holes later.
So i decided to drill only half of them, positioning them like a chess board.
Point 5 proved to be a lie, i spent 4 hours drilling the 168 holes, and i almost missed my bus home.

I controlled the depth by putting a standard unwarped cap inside and a credit card across it to see if the cap touches the card. If it did, i drilled a bit deeper. Then i took the cap out with a magnet. And moved on. A bottle cap needs at least 7mm deep niche to fit, unless it is warped or bent.

I had to cool down the drill bit after every 4-5 holes with a sponge drenched on ice cold water to avoid warping and burning. Luckily, i faced no real problems but my own physical exhaustion.

So much sawdust. I wore a mask btw.

I saved some sawdust on case i needed to repair the wood or fill holes by mixing sawdust with glue.

Some of the holes surely were not a perfect 90 degrees in, but they are apart enough so that it is hard to tell. The caps also hide imperfections.


Done drilling. My drill is smoking, my right hand is trembling, and my back is killing me. But it is ready for oiling. I had 15 minutes till my bus home and used this time to clean up and apply a single coat of double-boiled linen seed oil.

Cleaned up. No oiling pictures because i had to catch a bus.

Next weekend. At the end of the day i had to take the board home with a limited space. So i put on the leg bases. I oriented them at the 45 degrees with 10 cm allowance from each side, like 10% off the longest side.

Here you can see that the edges are a bit rough.
ADVICE: position your legs so that the screws don't hit any knots in the wood.


I had some time until departure and figured i could do something else. Like a plank for the surge protector.

I took the undamaged 10x60 cm leftover plank and put some metal corners on it. The idea was to attach it to the underside of the tabletop to screw my surge protector to it, so that it didn't lie on the floor.

Looks good enough.


Fits well but i need to get both parts home first, time to pack up.


While going home i figured i could take my cable game even further, but it needed more holes. Good thing is, i already had the surge protector i wanted to use, and had no problem marking. This time the holes went all the way through. To avoid making a mess, I literally put the part in a bag while drilling.

The screws holding the surge protector are in place.

Thank God it fit.

Test of the concept. Looks good enough. A standard PC power cord fits in a 30mm hole. Behind it they will be held by zipties.

Time to screw the plank to the tabletop.

Two collapsible chairs instead of a workbench.


Now fix the legs.


I ordered the glass at a nearby glass shop. It is basic with rounded corners, cost me like 25 EUR. The size is a bit off, but only i can see that. Next time i will order a 99x59 glass.

Next is putting the bottle caps in. Took me a while day to figure out the patterns.


The cablework. Later i also wound the master cable (white on the left) around the far left leg so it didn't dangle. In the end, no cables touch the floor.

Kinda clunky but at least no cables are on the floor.

The glass holds the weight of the pc and the monitor, that's good.
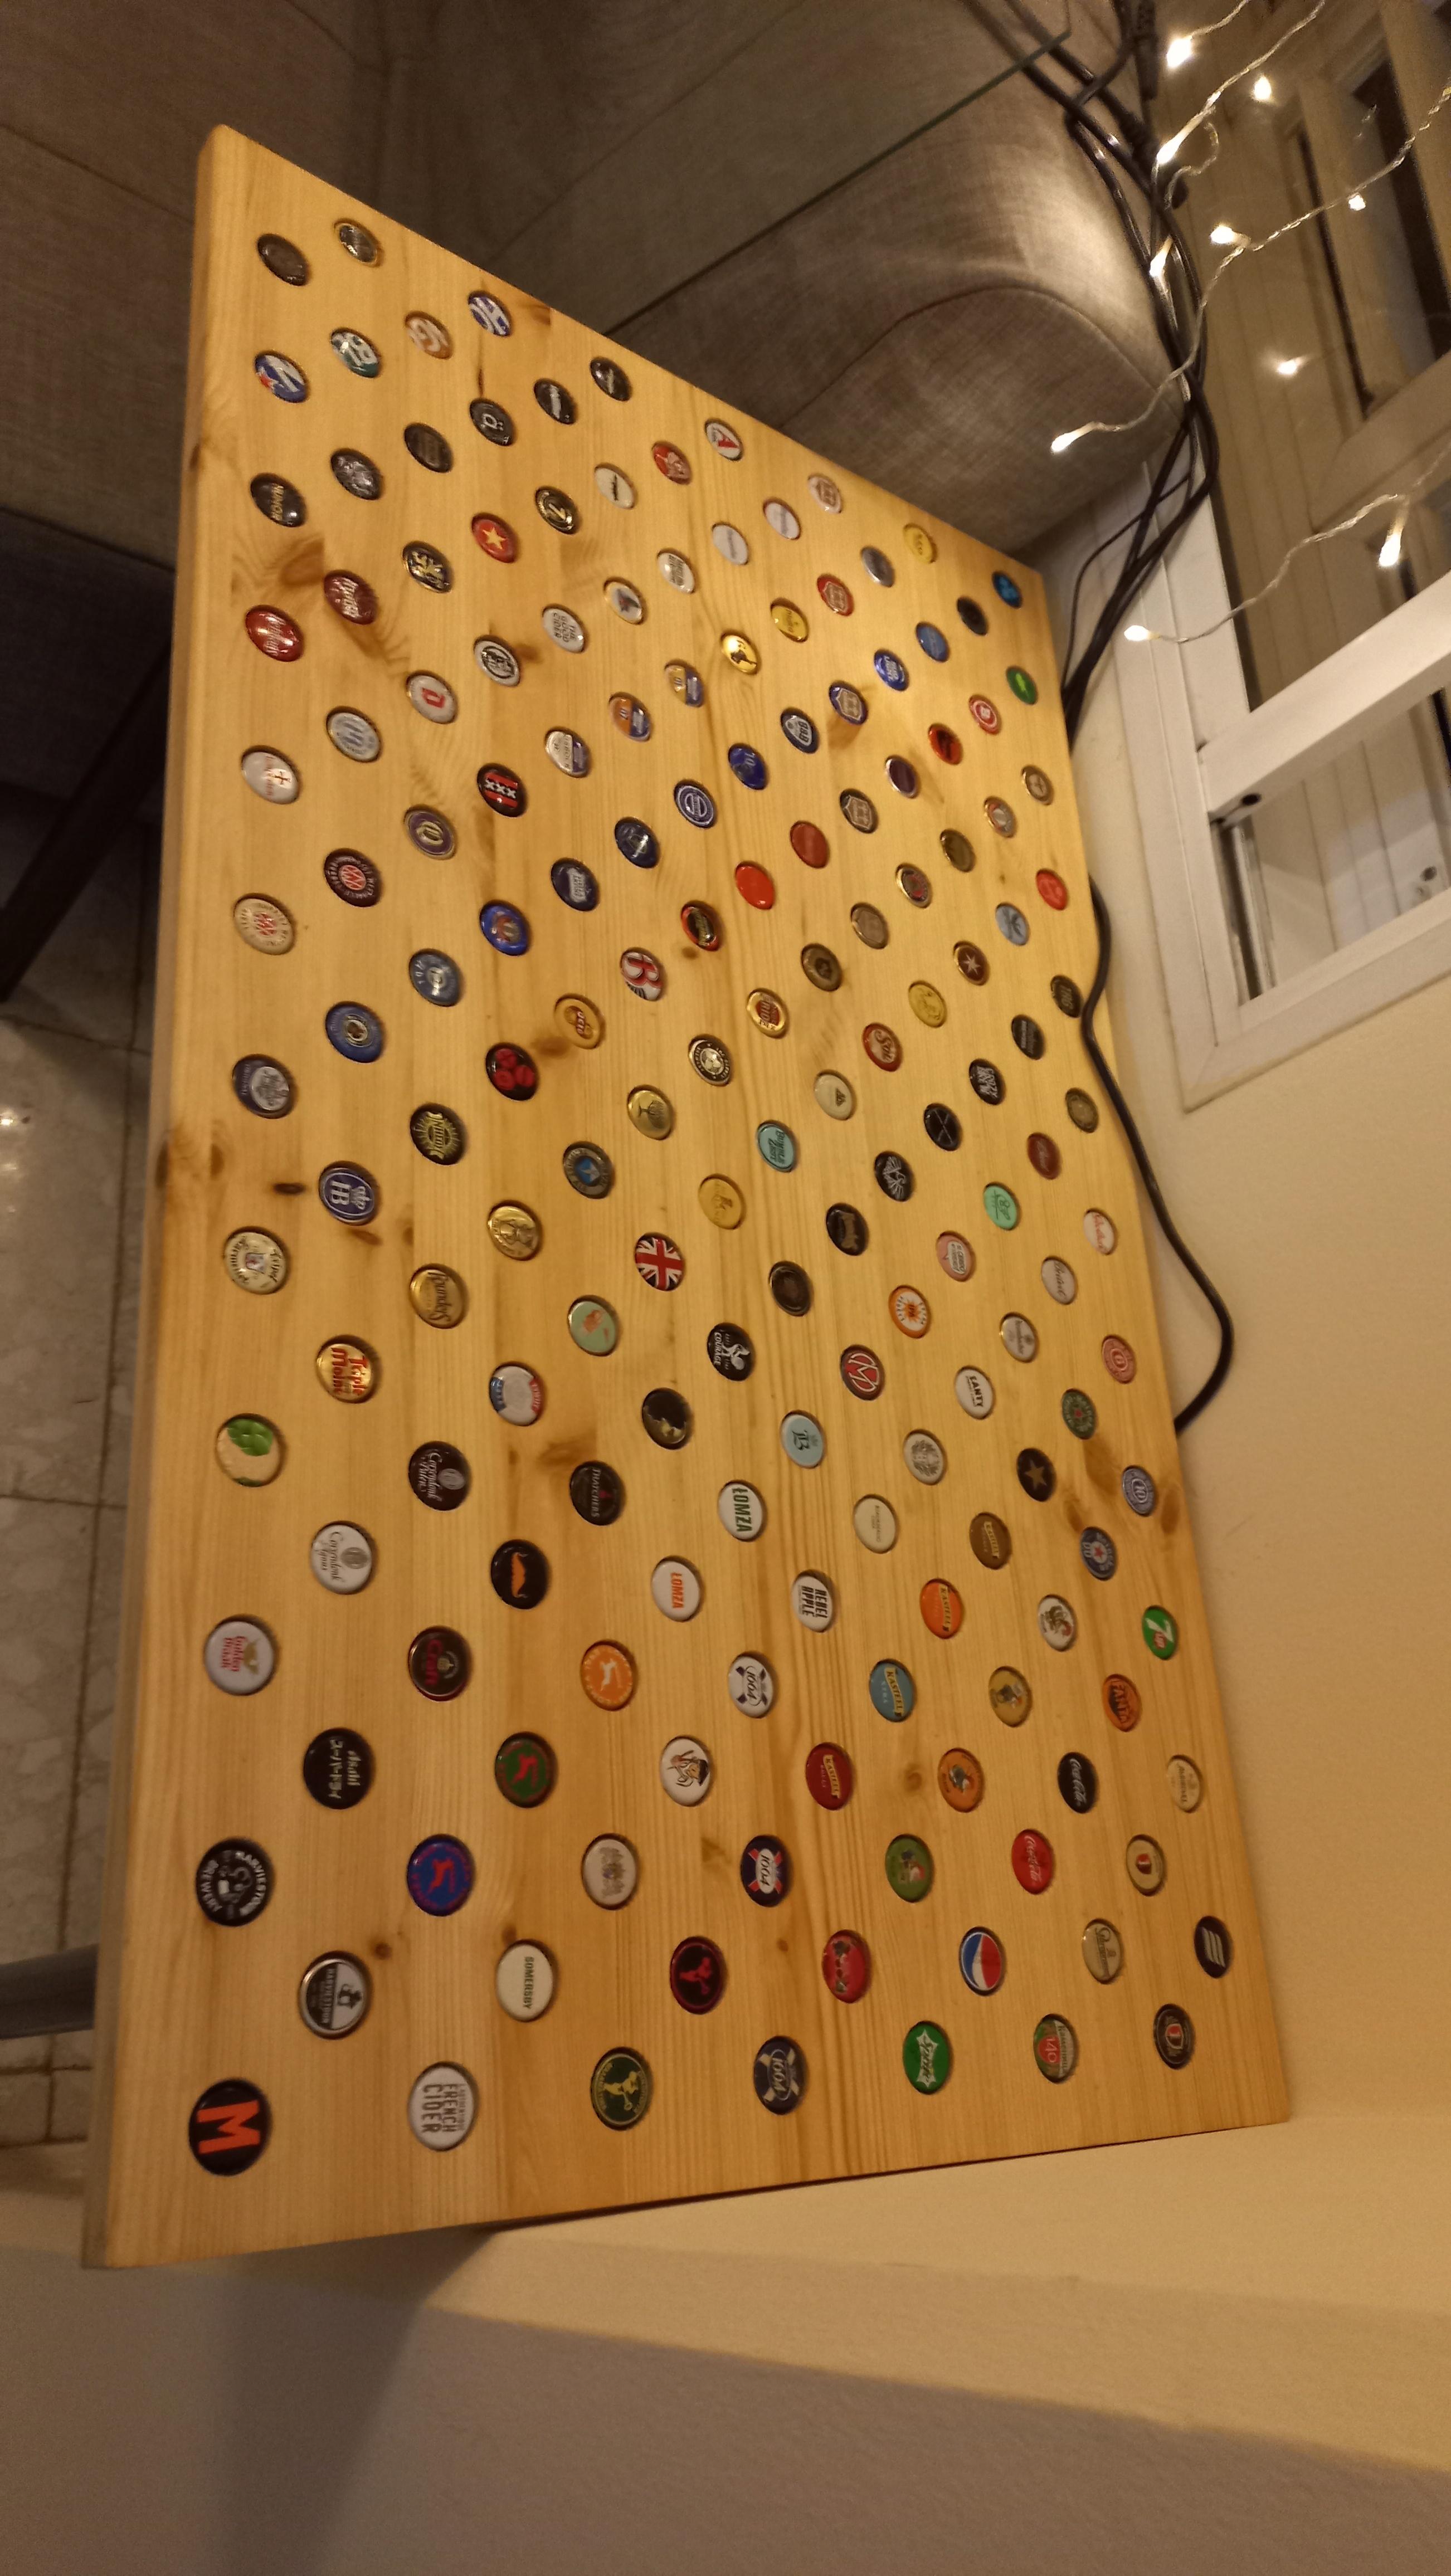
This is how i positioned the caps. I had collected around 300, but as you remember, i opted for an increased X-axis interval, so i only needed like 168. The best caps went to the front of course. There are all different, no two are the same.

The rest i put in a vase, still figuring out what to do with them.

Find your favorite beer/cider/pop.

End result.
Thank you for your time! And happy holidays!
UnitConversionBot
1 cm ≈ 390 thousandths of an inch
UnitConversionBot
30mm ≈ 1 2/8 inches
UnitConversionBot
35mm ≈ 1 3/8 inches
SupermassiveZebra
Hell yeah for craft projects and for using actual glass instead of drowning it in tacky resin
mirrorz
I made this one about 20years ago. I glued them down and did a few resin pours over them to seal it.
meistergervant
Cool stuff. At first i also wanted to make a pattern by using same colored caps.